A Recipe for 60-something Pineapple Tarts and 6 Life Lessons

6109

Life Lesson #1:  Seize the day, and the pineapple.
My Peranakan tart-chaperones and I had been planning this pineapple tart day for several weeks by now, and we had said we would start at the crack of dawn and push on until dusk, death or dinner called us elsewhere.  We did start close to the crack of dawn, but we took our time scoffing vegetarian bee hoon, reading the newspapers, talking to the dog, playing hide-and-seek with the air-con repair man, scratching our heads over the correct population size for Singapore, before we finally went in search of pineapples.  I suspect that we were sort of afraid to start handling real rather than rhetorical pineapples, to actually excavate these pineapple tarts from the realm of memory into the here and now.  I know this was at least true for me.  I am not a baker, and I am terrified of what can become of the simplest baked goods in my hands. But that doesn’t stop me from getting bitten by the baking bug every so often, and all I need to do is mention it to these tart-chaperones, and the deed is as good as done.  As we hurried out the door, one of us said, “Don’t know whether there are any more pineapples left.  The aunties may have bought them all by now.”  To which I said, “What are you talking about?  How can the market possibly run out of pineapples?”  It’s hard to say which of us is right, because, in the event, we didn’t even find the market.  We started at the bakery supplies shop, where we found that all the pineapple cookie cutters were sold out even though an extra large shipment of them had been brought in (prompting another incredulous line from me: “Who are all these people who still make their own pineapple tarts??”).  We were so debilitated by the unavailability of pineapple tart cookie cutters,  we lost the will to find a market.  Thankfully, next to the baking supplies shop, in a shop calling itself a building contractor and trading shop, tucked in a box on the bottom-most shelf, we found some pineapples.  So that was that — there was no getting away from making these tarts.
6113
Life Lesson #2:  Don’t take sass from cheeky uncles, or your pineapple.
Back in the day, when tart-chaperone #1’s whole family got down to their annual pineapple tart-production day, her dad started it off by unsheathing his special pineapple-skinning knife, and skimming off their ornery husks to unveil the sweet golden flesh inside.  Today, I was given strict instructions to get the pineapples skinned at the shop, because my Peranakan tart-chaperones and I were children of a different age, possessing no special pineapple-skinning knives.  While you get your pineapples skinned, it’s only natural to get into a conversation with the pineapple uncle — watch out!  Pineapple uncles are not pineapple uncles for nothing.  He praised me for my selection of the pineapples, $4 Dole pineapples from the Philippines (a scandal! considering you can much cheaper ones from Malaysia… not like there were any other pineapples for me to select), saying, “These are top grade pineapples.  With these pineapples, you won’t need any special kung fu, and your pineapple tarts will still be great.”  I replied, “Oh good, because I don’t have any special kung fu.”  He didn’t take a beat to reply, “Yah, I can tell.”  And then he had the cheek to remind me to bring him pineapple tarts to eat after I made them!  Get your pineapples home, and chop up just the fleshy bits finely (junk the central hard cord).  Or you can also grate instead of chop, but if you do that your pineapple jam later will be all beardy, and one of the tart-chaperones may say to you, “The hairs are sticking out everywhere!” (something you don’t expect to hear when baking). Drain it until it sort of holds together like a fibrous ball when you drop it in a bowl, but not until it’s bone-dry, because you need that liquid for cooking down the jam without burning.  Four pineapples: four fibrous sort-of balls.
6117
Life Lesson #3: Keep calm, and carry on stirring.
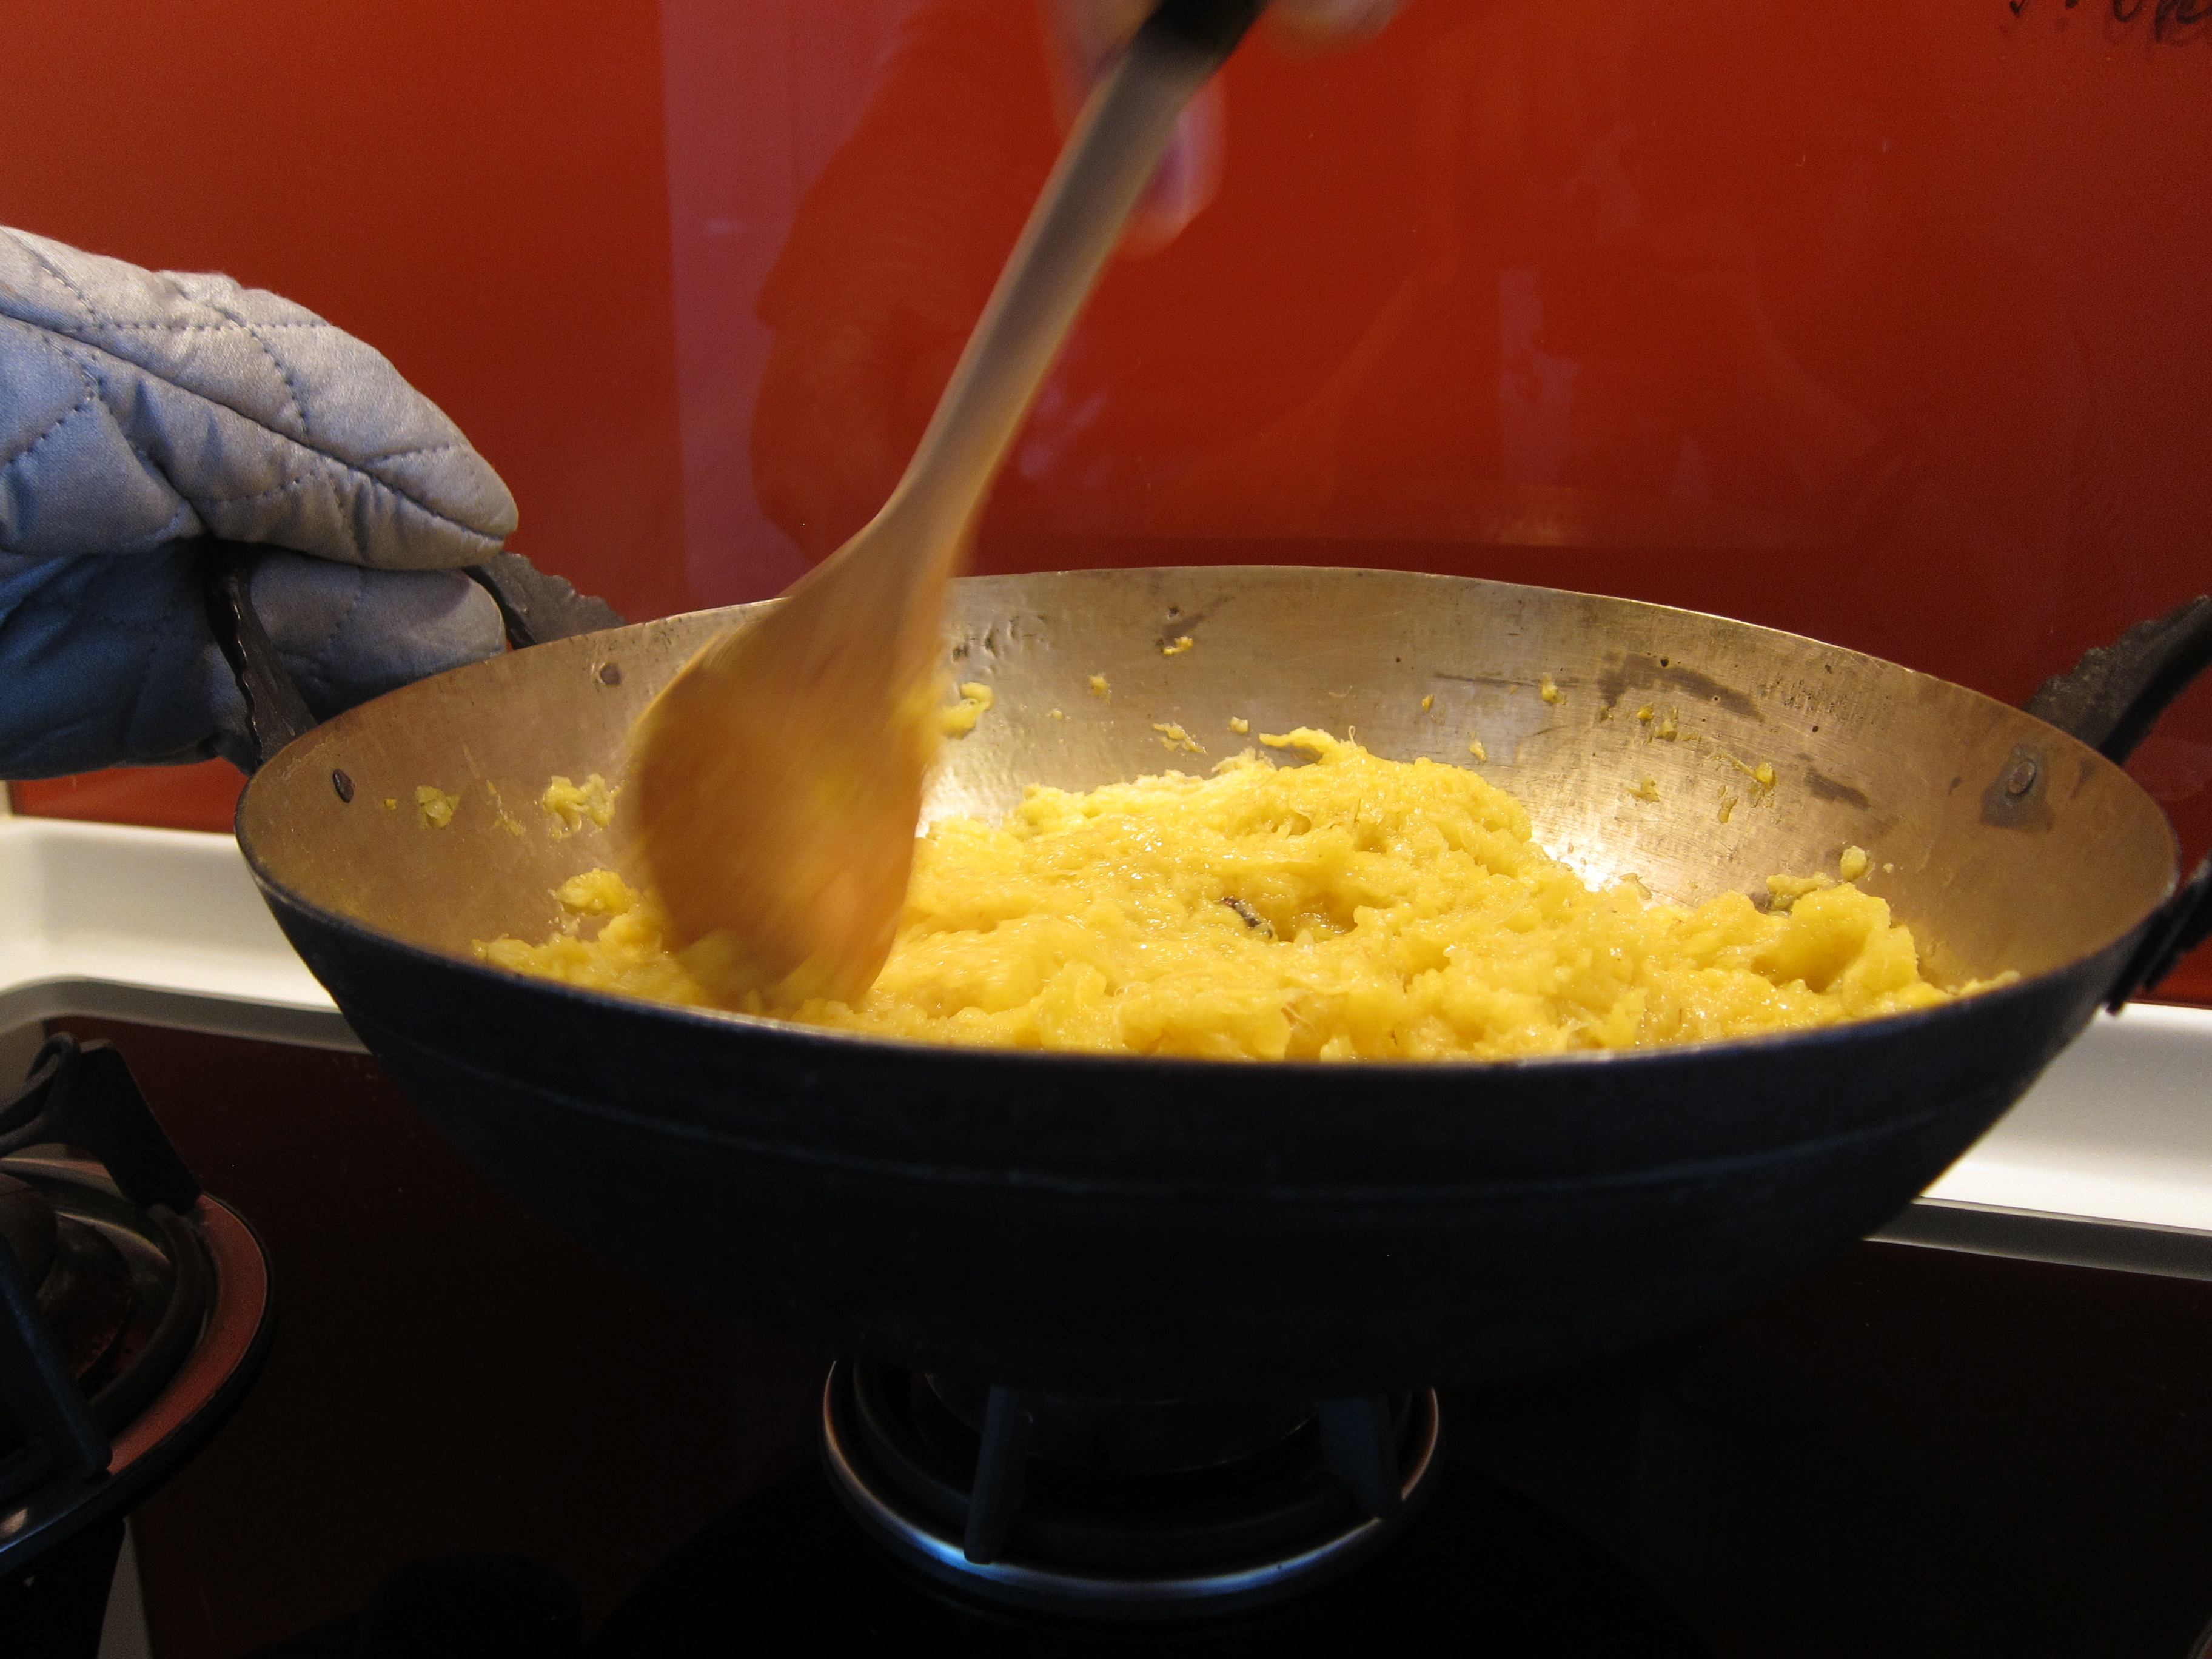
Now comes the jam-making.  Use a brass pot, in this case tart-chaperone #1’s grandmother’s special pineapple jam-making brass pot (her family members all seem to have instruments reserved for dealing only with pineapples).  Nobody ever thinks to tell you these things, but brass pots are just the thing because pineapples are pretty acidic (you’ll know this when you cut yourself up while grating and the juices sting your cuts) and if you use something like stainless steel or iron, the acid will act on the pot and give your pineapple jam a metallic flavour.  People who don’t have heirloom brass pots from their grandmothers can use enamel-coated cast-iron pots.  Toss your yellow fibrous sort-of balls into the pot, together with a cinnamon stick, maybe ten cloves, and say three, four tablespoons of brown sugar.  It’s all according to taste.  You start with less sugar, and you can amp up as you go.  This process goes on for about an hour or more.  At first, you can just stir your pineapple jam every two minutes or so, and spend the time in between thinking, will this jam ever stop being yellow?  Then when it begins to turn golden, you’ll have to watch it like a hawk and stir it relentlessly so it doesn’t accidentally burn.  Ours did almost get burnt, when we got caught up talking about our futures, our dreams, something like that.  We had to put all that on hold and focus on the jam.  You’ll know when it’s ready.  It will look like the jam you see on pineapple tarts, and there will be no more liquid pooling at the bottom of the pot when you clear a hole in the jam.  Turn off the fire and turn your attention to the pastry.
6119
Life Lesson #4: Time, tide, and butter wait for no man.
All things considered, this is a very democratic pastry, in that you need no more complicated and expensive equipment than a fork.. and a healthy sense of haste.  We nicked this recipe off the internet and would give credit except we can’t remember where we found it.  You combine 400g plain flour, 50g corn flour, 1/4tsp salt, 6tbsp icing sugar in a big bowl with a heavy base (that’ll give you ballast for what you get down to next).  The corn flour and the icing sugar do a lot to help the pastry hold its shape as well as be more melt-in-your-mouth.  Again, I would give the credit to the cunning cook who realised this, if my memory weren’t full of holes.  Drop 280g of cold, unsalted butter, chopped up into, say 1cm-thick pads, into the powder mix.  Usinh the tines of the a fork, press down into the cold butter pads until it starts to flake into the flour, until there are no more noticeable chunks of butter, and you look like you’ve got a big bowl of fine bread crumbs.  You have to work fast here, or the butter melts.  Make sure your butter is not already softening to begin with, because you need things to stay dry up to this stage.  If you’re cold-blooded, you can use your fingertips only to rub the butter into the flour, to get the same effect.  Beat together 3 egg yolks, 3tsbp cold water, 1/2tsp cognac (in my case, tart-chaperone #1, in a fit of puritanism, made me use vanilla extract instead of cognac), and add this into the flour-butter mixture.  Using your fingertips only, pull everything together into a ball.  As long as it all holds as one entity, you’re good.  Do not knead, or you will get the gluten to start acting, and that’s not good for our shortcrust pastry.  Pop the dough ball into the fridge to chill, get yourself a drink (at least 10 minutes).
6122
Life Lesson #5: Many hands make short work, and shortcrust pastry.
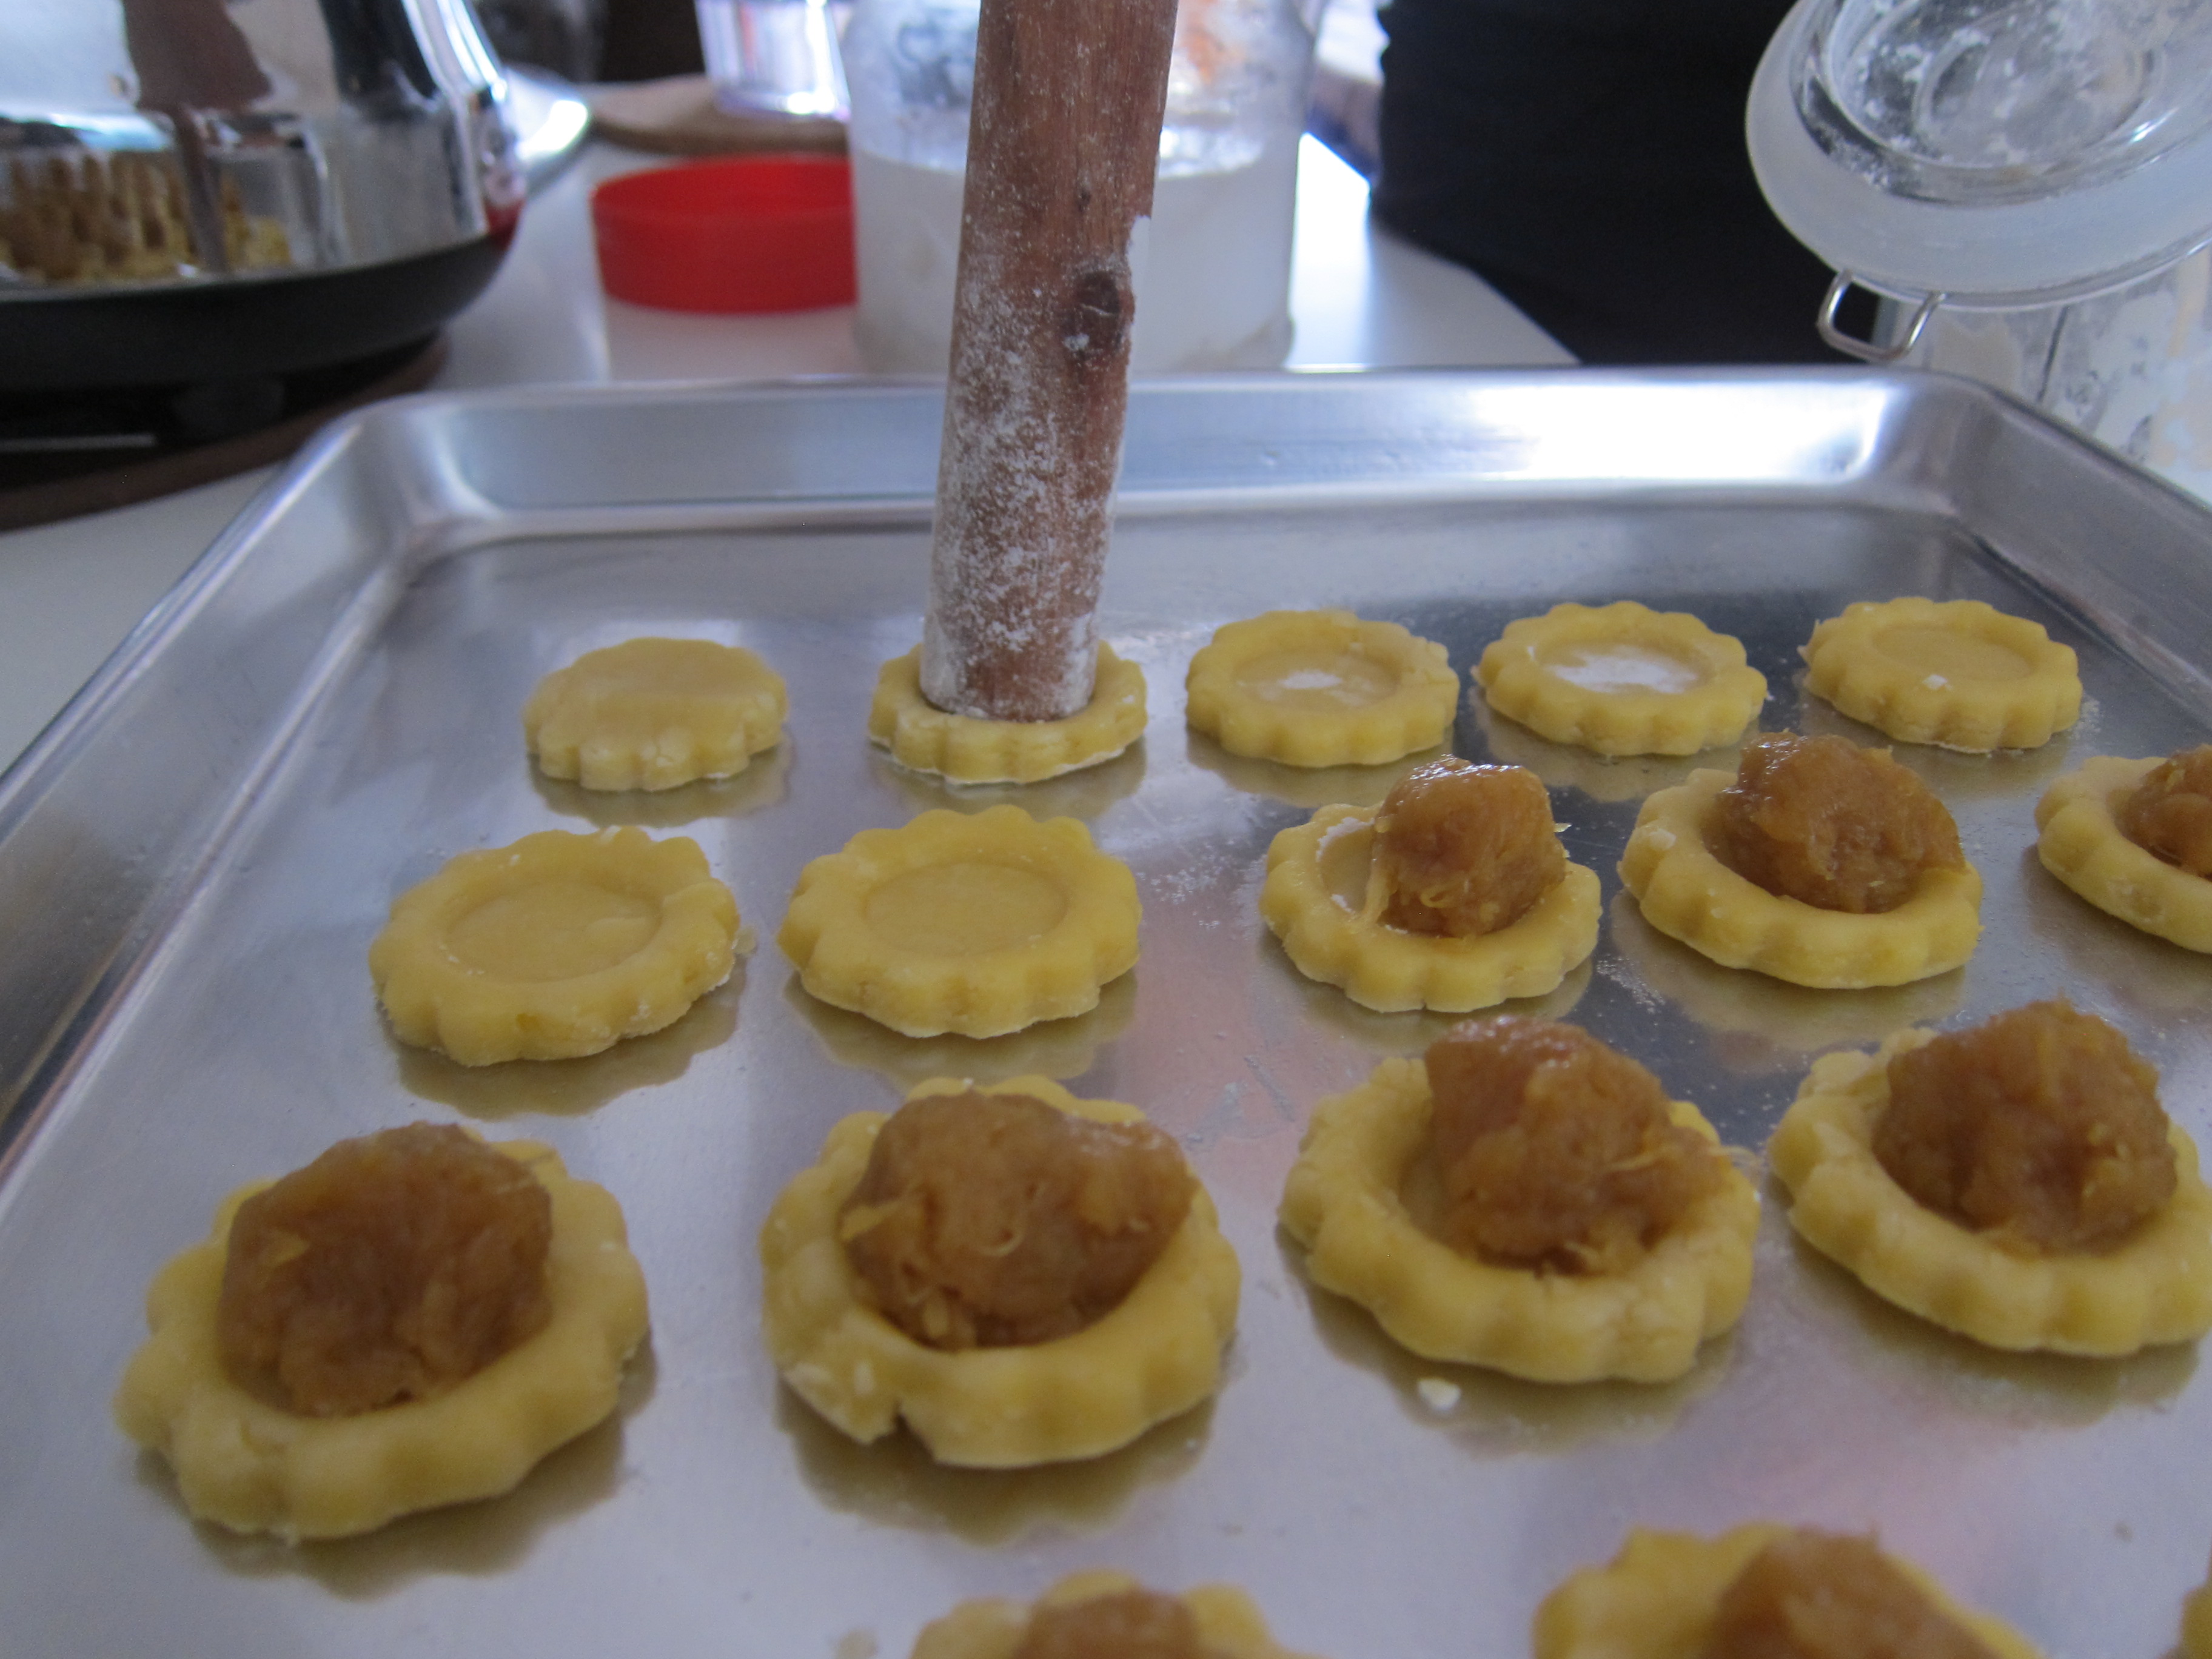
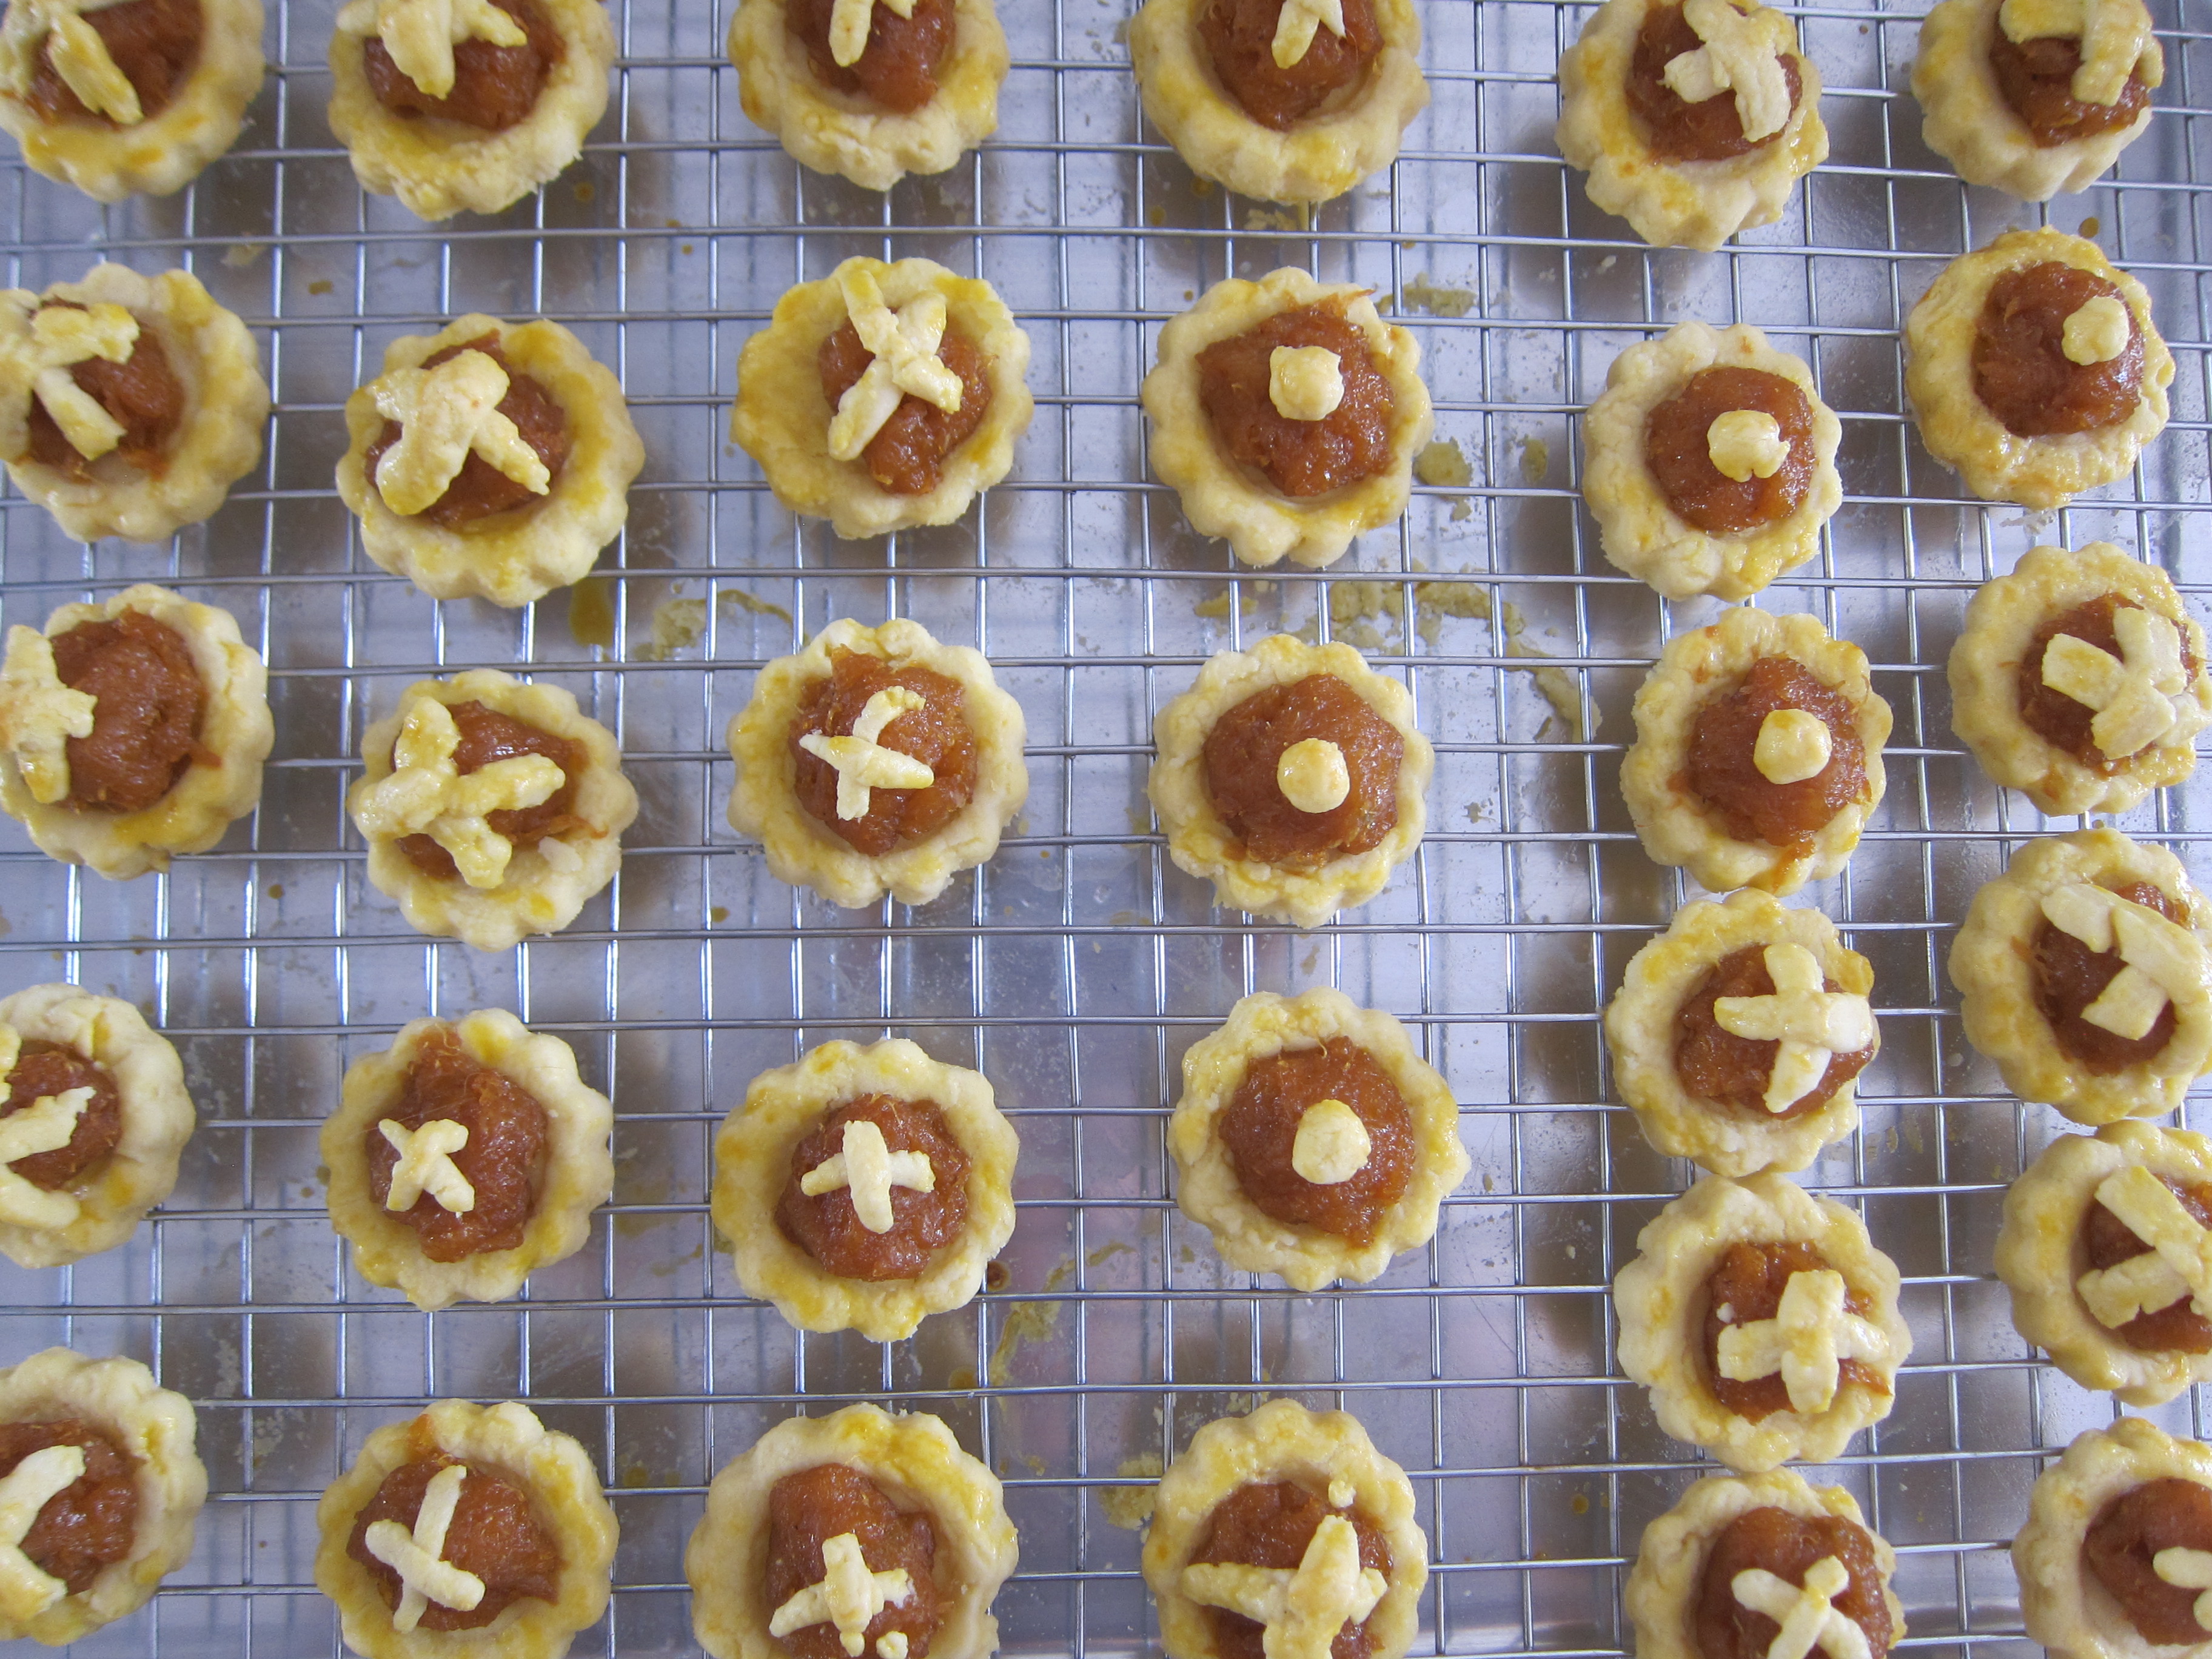
Cast back in history and see if there’s any instance ever of anyone making pineapple tarts as a solo enterprise.  Tart-chaperones #1 and #2 both remember pineapple tart production as whole family affairs, with some people having clear and highly evolved duties, while others were assigned as necessary to various sundry chores.  The whole reason I suddenly wanted to make pineapple tarts in the first place was because I had been thinking of my old nanny, who used to dragoon all the kids she looked after into her kitchen, which became, in the weeks before each Chinese New Year, a hub of cookie cottage industry.  Ahh, the good old days before food preparation licences and child labour laws.  Maybe, in those good old days, because they used lard in the pastry, there wasn’t as urgent a need to work fast.  And, they probably started early enough to get themselves the special cookie cutters that we failed to get.  So we needed three pairs of hands: tart-chaperone #1 to roll out the dough and cut out the basic shape, tart-chaperone #2 to use the end of the rolling pin to make a depression in each one, and I to roll balls of pineapple jam and place into the depressions.  I strongly encourage you to put your own signature on your pineapple tarts, since there are so many commercial ones out there.  I tried to make my pineapple jam filling towering and conical, but tart-chaperone #1, puritan that she is, squashed them back down.  Her traditionalist grandmother and father would have spit blood at conical pineapple tarts.  So I was left to play only with the latticework of pastry on top of the jam.  I started with crosses but the pastry kept disintegrating in my hot-blooded hands, so I turned to making nipples instead.  Brush liberally with egg wash (2 egg yolks beaten with 2tbsp water).  Pop into 160-degrees Celsius oven for 20 minutes.
6128
Life Lesson #6:  Embrace your achievements, and your family.
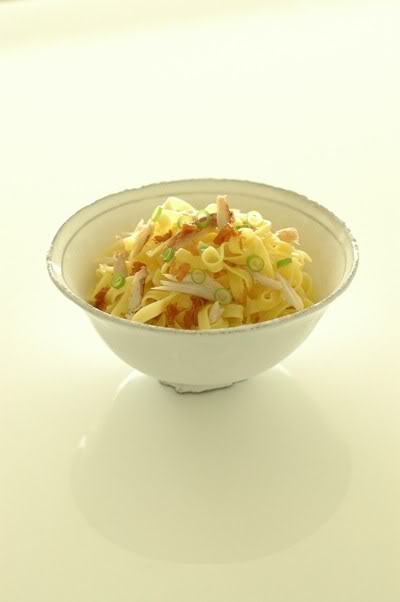
You may think you’ve come to the end, but, if after all that slaving you don’t make the most of your achievements, then you’ve missed the point of pineapple tarts.  I highly recommend that you put them in pretty boxes and give them away to loved ones, particularly anyone who’s ever doubted your baking skills (in my case, almost everyone), liberally flavoured with stories about the making of the tarts, until your recipients are suitably impressed.  I tried this with my mother, as I packed the pineapple tarts before her eyes, one by one, slowly, tantalisingly, from the big container to a takeaway box for her, until, before I was done, she started to try to trick me into giving her all the pineapple tarts instead of saving any for my uncles and aunties, who, she said, never really loved me anyway, and had diabetes and high blood pressure and all kinds of reasons why they shouldn’t have pineapple tarts.  The best part of this whole process is when you’ve given them all away and are left with nothing but dirty bakeware and buttery crumbs and the wish that you had more to give.
With thanks to my tart-chaperones, their own tart gurus, my old nanny, and even the pineapple uncle.
Copyright of Phua Mei Pin.
Phua Mei Pin is a former policy-maker and political journalist.  A lifelong writer and lover of food, she is Teochew-Hakka with pronounced admiration for all things Peranakan.

Secret Ingredient X XO Sauce

XO sauce 1

In my household, XO sauce has become a must-have. However time-strapped one may be, however bare and unshopped-for the fridge and cupboard, having a bottle of this glorious dried scallop-and-shrimp condiment -which keeps very well – on standby means dinner can be ready in two shakes of a dog’s tail. I am assuming that by bare one nonetheless has pasta lying about.

Of course, it is far too scrumptious to only dip into as a last-minute insta-meal solution. It most certainly deserves to be the star of its very own cabaret, the express point of a dish.

All this hullabaloo is with specific reference to the homemade, not garden, variety.

Since this – golly, has it really been over 5 years since I wrote that?! – I’ve had plenty of opportunity (not to mention time) to come up with my own version of XO sauce, adding a little pinch of this and a smidgen of that, playing around with the proportions of ingredients, seasoning to my taste.

XO sauce 2

The secret ingredient? Bacon. Yup, that’s right, bacon. Not so much to impose overt, dominant, bacon-y-ness, just enough to lend an enigmatic, can’t-quite-put-your-finger-on-it meaty savour, depth shall we say, a subtle suggestion of smoke. If you ever had a feeling that bacon makes the world go round, try this recipe and you may very well think of it as prima facie evidence of the case.

Sure, try making it without the bacon, the recipe below can be made bacon-free by straightforward omission. The XO sauce will still be yummy, but it will be a completely different animal. Just sayin’.

That out of the way, feel free to tweak – it is exactly the sort of recipe that calls for the cook to adjust to taste.

My most recent batch was greatly facilitated by my new toy, an awesome Preethi mixer grinder, the sort of lean, mean, multi-tasking Indian machine that’s affectionately known as a “mixie”, without which an Asian cook – or any cook, really, who enjoys preparing Asian recipes – would be sadly bereft. Wet grinds, dry grinds, spice pastes blitzed to a textbook case consistency without the addition – horrors! – of water or oil to get the work done, name a task that your archetypal processor or blender can’t wing (albeit these machines were designed for tackling other tasks/cuisines) and the Preethi will fill the gap, no sweat. Thank you, A, D, S and S for such a thoughtful housewarming gift! If you are keen and reside in Singapore, Preethi is available at Shermay’s Cooking School (do call the school at +65 6479 8442 or 6479 8414 before making a trip down as the Preethi is exceedingly popular and I hear stock flies off the shelves).

While best known for its ability to produce a rempah with a texture that’s the closest second there is to the hand-pounded McCoy, in the XO sauce recipe which follows, it is used to pulverise the dried shrimp into a fine floss.

X XO Sauce

Yields 5 cups

225 gm Dried scallops
200 gm Dried shrimp
200 gm Shallots, peeled and coarsely chopped
10 Garlic cloves, peeled and coarsely chopped
150 gm Fresh red chillies, de-seeded and coarsely chopped
400 ml Peanut oil
100 gm Dark brown Muscovado sugar
100 gm Streaky bacon, finely minced

1.Soak the dried scallops in 2/3 cup of tepid water in a heat proof dish for 1 hour – almost all the water will be absorbed, and the dried scallops should be sufficiently softened such that they break apart when gently pressed. Steam until tender, which will take 30 minutes to 1 hour (depending on the size of the scallops). Remove dish from heat and let cool, reserving the juices. Finely shred the scallops. Set aside.
2.Rinse the dried shrimp under tepid tap water. Drain. Pat dry. Grind into a fine floss using a food processor (or use a mixie if you have one). Scrape out and set aside in a separate bowl.
3.Using the pulse function, grind the shallots until finely minced. Scrape out and set aside in a separate bowl.
4.Using the pulse function, grind the garlic and chillies together until finely minced. Scrape out and set aside in a separate bowl.
5.Heat the oil in a large heavy pan over medium high heat. Fry the shallots, dried shrimp and sugar until the sugar begins to caramelize, stirring constantly. Add the garlic and chilli mixture, bacon, dried scallops and their reserved steaming juices. Turn heat down to medium. Continue to fry for about 30 minutes, stirring constantly. The finished condiment should be highly aromatic and a deep russet hue.
6.Remove from the heat and let cool completely.

Storage: Store in airtight containers in the refrigerator for up to 2 weeks. Or freeze for up to 2 months; thaw overnight in the refrigerator before using.

XO sauce 3

PS: It might seem like a large quantity. But if you’re going to make the effort, you may as well make it a big batch. That way, there’s plenty to go around – for stashing away in the freezer for those proverbial bare cupboard moments, for giving away to friends and family, for elevating simple stir-frys, for majestically accompanying everything from congee to gyoza to drunken chicken. But my favourite use of it is hands-down with pasta (in the above picture, I had tossed handmade tagliatelle all’uovo with XO sauce, freshly picked crab meat, fried spring onions and garlic).

Copyright of Joycelyn Shu. Reproduced with Permission.

Laksa Lemak

Laksa

Last night, W called to ask if I could make him some laksa lemak, one of his all-time local favourites. He’s back today for a very brief spell before taking off again, so it goes without saying that I obliged. Laksa exists in countless incarnations throughout the Malay Peninsula – Sarawak, Malacca, Penang, Kuala Lumpur, Johor, and of course Singapore, each have their own tasty version. Extravagantly enriched with coconut milk, laksa lemak is the version most commonly found across the length and breath of our island (and particularly in the Katong area, but that’s another anecdote altogether…). Influenced by my maternal grandmother – who was, incidentally, as formidable a cook as the paternal grandmother who brought me up – the laksa lemak I make is Nonya in style. The recipe is hers, except that she would have made her own fish balls using ikan tenggiri (I’ve used ready-made fried fishcakes) and extracted her own coconut milk using freshly grated coconut (instead, I turn to the stall at Tekka Market which sells freshly extracted coconut milk).

LAKSA LEMAK

Prawn Stock
20 large tiger prawns
1Tbsp peanut oil
1.5 liters water

Rempah
15 shallots, peeled and minced
6 garlic cloves, peeled and minced
10 to 15 dried red chillies, deseeded, soaked till soft, drained and minced
10 candlenuts, chopped
3 lemongrass stalks, tender inner stems only, minced
Fresh tumeric, 1 thumb-length piece, peeled and minced
Galangal, 1 thumb-length piece, peeled and minced
1Tbsp belachan (shrimp paste)
2 Tbsp coriander seeds

4Tbsp dried shrimp, soaked till soft and drained
6Tbsp peanut oil
600ml coconut milk, preferably fresh
1Tbsp salt, or more
2Tbsp gula melaka (palm sugar), or more

500gm fresh laksa noodles, or thick vermicelli

Toppings
20 raw prawns, shelled and de-veined (left from making prawn stock)
Large handful of beansprouts
2 fried fishcakes, sliced thickly
taupok (deep-fried tofu puffs) squares, sliced thickly
8 quail’s eggs
Large handful of finely shredded cucumber
Handful of finely shredded laksa leaves (daun kesom)

To Serve: Sambal Goreng
3 garlic cloves, peeled and minced
2 candlenuts, chopped
10 shallots, peeled and minced
10 dried red chillies, soaked till soft and minced
1Tbsp tamarind pulp soaked in 100ml water
3Tbsp peanut oil
1Tbsp tomato puree
1 tsp salt
1Tbsp gula melaka (palm sugar)

For the prawn stock: Peel and de-vein the prawns. Set them aside. Only the heads and shells are needed for the stock. Heat the oil over a medium flame in a stockpot. Stir fry the prawn heads and shells till bright orange and slightly caramelised. Add the water and bring to the boil. Turn heat down and simmer gently for 1 hr. Strain and reserve.

For the rempah: Except for the shrimp paste and coriander seeds, pound all the ingredients for the spice paste according to the order listed with mortar and pestle. Ensure that each ingredient is thoroughly assimilated before adding the next. Wrap the shrimp paste in a small square of aluminium foil and toast it over a small flame in a dry pan until aromatic – about 2-3 minutes. Unwrap, add to spice paste, and incorporate. Toast the coriander seeds over a small flame in a dry pan until aromatic – about 60 seconds. Grind to a fine powder with a spice/coffee mill. Stir the ground coriander into the spice paste.

For the laksa broth: Grind the softened dried shrimp to a fine powdery consistency. Set aside. Heat the oil in a large saucepan over a medium flame until fairly hot. Add the rempah and fry for about 10 minutes – be patient and stir constantly until the paste becomes thick, fragrant, several shades deeper, and the oil separates from the paste. When the paste is sufficiently cooked, add the ground dried shrimp. Stir for 1 minute. Add the reserved prawn stock, coconut milk, salt and palm sugar. Slowly bring to a simmer. Simmer uncovered for a few minutes, adjusting seasoning with more salt or sugar as needed. When broth tastes right, turn off heat, cover, and set aside.

Bring a big pot of water to a rolling boil. Scald laksa noodles for 15 to 30 seconds. Drain in colander and arrest cooking by placing under a running tap for a few minutes. Drain again and set aside. Using the same pot, bring some fresh water to a rolling boil. Blanch whole prawns until cooked, about 2 minutes. Lift out with a slotted spoon and split in half lengthwise. In the same water, scald bean sprouts, fishcake slices, and taupok slices in separate batches for 10 seconds each, lifting each out with a slotted spoon. Set aside. Place the quail’s eggs in a small pan of salted cold water. Bring to a boil over brisk heat and boil for 1 minute before draining and cooling under a running cold tap. Shell carefully. Cucumber and laksa leaves should be shredded as close to your serving time as possible.

For the sambal goreng (this can be made several days in advance): Pound the garlic with mortar and pestle to a pulp. Pounding each ingredient till incorporated before adding the next, pound the candlenuts, shallots and chillies. Set paste aside. Strain the tamarind water; reserve the liquid and discard the seeds left in sieve. Heat oil in medium saucepan over medium heat till fairly hot. Add reserved paste, turn heat down to low, and slowly fry for about 10 minutes until thickened, a deep ruddy brown, and the oil separates from the paste. Be patient; the spices must be adequately cooked to mellow and lose their raw taste. Now add the reserved tamarind water, tomato paste, salt and sugar. Stir constantly over a low heat until reduced to a jammy consistency, adjusting seasoning to taste. Scrape into a bowl. Cool. Chill till needed.

To serve: Portion noodles and beansprouts between deep bowls. Top each bowl with prawns, fishcake, taupok, quail’s eggs, and cucumber. Bring laksa broth to the boil. Ladle boiling broth into waiting bowls. Scatter the shredded laksa leaves on top and serve immediately. Let diners help themselves to the sambal.


Copyright of Joycelyn Shu. Reproduced with Permission.

Mee Siam

Mee Siam

Despite his robust build and appearance, W really has a fairly sensitive constitution – by which I mean his poor tolerance of spicy food. As much as he loves it, he has a pretty low threshold when it comes to the Scoville stakes, paying dearly every time he indulges in a fashion I don’t think I need to go into detail here. I attribute it to his Stateside upbringing; not having been weaned on sambal at a tender age, he never built up an endurance. Nonetheless, like every self-respecting Asian, he’s totally addicted to the no pain-no gain hot pepper high, the endorphin rush that’s released as tingled nerve endings trick your brain into thinking you’re in pain. Amongst the spicy foods W will gladly suffer for, Mee Siam ranks high on the list. This tangily spicy rice vermicelli dish, like many other classics in the Nonya repertoire, blends essentially Malay flavours like belachan (shrimp paste) and coconut milk with unmistakably Chinese accents. In this particular instance, taucheo (salted soy beans) adds intrigue to the rempah (spice paste). Mee Siam is so-named as its spicy, sweet and sour flavour and redolence are somewhat similar to, or influenced by, Thai food. If you’re petrified of chillies or are cooking for loved ones who are, reduce the fear (or rather, heat) factor by stripping out the veins and seeds of the fruit – that’s where the capsaicin is concentrated. And like many other Nonya dishes, Mee Siam is pretty labour-intensive. However, therempah, gravy and toppings can all be prepared ahead of time – it’s then just a matter of quick assembly when you’re ready to tuck in. You can dish everything out attractively into individual bowls, serving the piping hot gravy in a separate jug for people to pour over just before eating – all the better to unleash the heady aroma of the slivered bunga siantan (the beautiful pink ginger buds of the torch ginger plant – an optional, but lovely, touch) that tops the vermicelli. Have fresh chilli sambal and cut kalamansi limes at the table for those who like it hot and/or tart, as well as some keropok(prawn crackers) for sopping up the gravy.

MEE SIAM

Prawn Stock
*12 large tiger prawns *2 litres water
De-shell and de-vein the prawns. Set them aside. Only the heads and shells are needed for the stock. Place heads and shells in a stockpot. Add 2 litres of water. Bring slowly to the boil, then turn heat down so water simmers. Simmer for 1 hr, or until water is reduced to 1 litre. Strain. Set aside.

Rempah
*10 shallots, peeled and minced *6 fresh red chillies, de-seeded and minced *6 dried red chillies, de-seeded, soaked till soft, drained and minced *2 lemongrass stalks, tender inner stems only, minced *6 candlenuts, chopped *1 heaped Tbsp belachan (shrimp paste)
Pound together all the ingredients listed except for the belachan. Wrap belachan in a small square of aluminium foil. Toast package in a small dry pan over low heat till aromatic. Unwrap, crumble into the rempah, incorporate. Set aside.

Gravy
*4 Tbsp peanut oil *100gm dried shrimp, soaked till soft, drained and finely minced *3 heaped Tbsp taucheo (salted soy beans), lightly crushed *1 litre prawn stock (from above)*4 Tbsp dried tamarind pulp dissolved in 1 cup water, sieved, tamarind water reserved *2 Tbsp gula melaka (palm sugar), or more *1 red onion, halved and finely sliced *600ml coconut milk, preferably freshly extracted
Heat oil in a large heavy saucepan over medium heat. When fairly hot, add therempah along with the finely minced dried shrimp. Turn heat down. Patiently stir-fry the mixture until it turns a deep terracotta colour and the oil separates – at least 30 minutes. Do not leave the pan unattended. When the paste is correctly cooked, add the taucheo. Stir for 1 minute. Now scoop out a third of the paste into a bowl and set the bowl aside (this will be used to cook and flavour the rice vermicelli later). To the remaining paste in the pan, add the prawn stock made earlier. Bring to a simmer, then add half the quantity of tamarind water specified, sugar and onion. Simmer for 30 minutes. Now add the coconut milk and simmer for a further 10 minutes, or till slightly thickened. Adjust seasoning to taste with the reserved tamarind water and more sugar (it is unlikely you’ll need any salt). Turn heat off, cover pan, set aside.

Toppings
*12 large tiger prawns, de-shelled and de-veined (from making the prawn stock), poached 2 minutes in simmering salted water till cooked, drained, sliced lengthwise *4 eggs, hard-boiled, peeled, quartered *A large handful of ku chai (Chinese chives; you can substitute chives or scallions), green section only, snipped into 2cm lengths *1 square taukua (firm tofu), well drained, sliced into 2cm strips, deep-fried in a vat of hot peanut oil till golden brown, drained on paper towels *4 kalamansi limes, halved *1 ginger flower bud, pink petals only, slivered (optional)
Prepare all the toppings as described ahead of serving. Set aside.

*200gm beehoon (dried rice vermicelli)
*Fried rempah (reserved quantity from making gravy earlier)
*250ml water
*Large handful of bean sprouts, topped and tailed
When ready to eat, soak the dried rice vermicelli in a large bowl of tepid water for 5 minutes. Drain and set aside. Place the reserved quantity of fried rempah (set aside from making the gravy earlier) in a wok or large frying pan over medium heat. Add the water. Bring to the boil. Add beansprouts. Stir and cook for a minute. Add the rice vermicelli, turn down the heat, and toss repeatedly with long cooking chopsticks to evenly mix everything. When the pan is fairly dry, dish the vermicelli out into individual serving bowls. Top each portion with prawn slices, egg quarters,ku chaitaukwa, a lime halve, and a scattering of ginger flower bud slivers.

To Serve
*Fresh chilli sambal
*Keropok (prawn crackers)
Bring out the dressed bowls of vermicelli along with dishes of fresh chilli sambal,keropok, and more lime halves. Bring the saucepan of gravy back to the boil. Pour into a jug and bring to the table. Pour gravy over vermicelli just before eating. Let diners add squeeze of lime and chilli sambal to taste.

Serves 4 to 6.

Copyright of Joycelyn Shu. Reproduced with Permission.

Gai Juk, Chicken Congee for the Soul

chicken congee 1

Growing up, I was put under the charge of a Cantonese amah for a while. Not a very long while; let’s just say having one cook in the kitchen was key to keeping the domestic peace. Her tenure may not have been long-lived, but her legacy prevailed in the humble, honest, heartening form of juk (or zhou in Mandarin), the soupy rice porridge/gruel also commonly known as congee.

There are many regional recipes for the making of congee; some are rice-based, some not, and yet some use a mixture of rice and other grains. Some start with raw rice, others specify the use of leftover cooked rice. The style in which our amah cheh made her congee, the style I was weaned on and identify with and crave, was classically southern Chinese. A mixture of two types of rice (regular long-grained white plus glutinous) slowly, slowly simmered in a vast volume of water until transformed into velvety, unctuous comfort food. No mere sustenance, this, but the penultimate restorative, a homebrewed cureall, a magical unguent to cosset the body and salve the soul. Be it the nourishment of the very young or the very old, or the nursing back to wellness of the ill, or the simple soothing of frayed nerves, there are few things that are entrusted with rising to the occasion like congee, especially if you, like me, are Chinese in ethnicity.

As a student at college half a world away from home, congee became an antidote to the occasional bout of homesickness. Till this day, whenever I’ve had an especially long or trying day, there is nothing I long to eat more. W had been under the weather recently, so we’d been tucking into congee suppers – gai juk(chicken congee), pei dan sau yuk juk (preserved egg and pork congee), or yu juk (fish congee) – pretty often the last couple of weeks.

Not everyone digs pei dan. And not everyone has access to super duper fresh fish, an absolute non-negotiable for yu juk, preferably slaughtered and filleted earlier in the day at the wet market, my personal preference for using in yu juk is either grass carp or snakehead (locally known as toman). So the recipe that follows is for gai juk. Some preliminary notes:

Rice I use a combination of two rices; one for taste, the other for texture, in a two-to-one ratio. First, a fragrant long grain, preferably hom mali. This translates from Thai to “fragrant jasmine”, although the aroma (hom) is really redolent of pandan and not jasmine. Mali, the reference to jasmine, is meant to describe the opalescent sheen of the grain rather than the scent. The subtle yet distinctive hom mali perfume makes an important difference to the final flavour of the congee. Second, a glutinous rice (sticky rice), as its high-amylopectin/low-amylose constitutional makeup greatly enhances creaminess.

Stock or water If you have good homemade chicken stock at hand, use that. This produces a richly flavoured congee. If not, use water (rather than canned stock or a bouillon cube). The chicken simmered with the rice and water imparts sufficient good flavour to the congee. Albeit mellower than the flavour produced using stock, I nonetheless feel it stands head and shoulders above the processed flavour introduced by the canned or cubed chickeny conveniences.

chicken congee 2

Gai Juk (Chicken Congee)
Yields about 4 servings

100 gm Long grain rice
50 gm Glutinous rice
1 Tbsp Toasted white sesame oil
2.5 litres Chicken stock, or water
1 tsp Coarse sea salt, or to taste
Half a small chicken (about 400 to 450 gm)
A slice of young ginger (about 1cm-thick)

Garnishes:
Tong chai (salt-preserved Tianjin cabbage pickle)
Fried shallots
Scallions, finely sliced
Coriander sprigs
Toasted white sesame oil

1. Combine the two rices in a large bowl. Wash and drain three times under water, each time swishing the rice around whilst rubbing the grains between your fingers.
2. Place washed rice in a heavy-bottomed pot with a capacity of about 5 litres. Coat grains with the sesame oil. Add the stock (or water), salt, chicken and ginger.
3. Bring to the boil over high heat. Reduce heat to low and cover. The liquid should simmer at the merest blip; use a heat diffuser/tamer mat if necessary. Cook for 2 hours, stirring occasionally to prevent the rice from sticking to the bottom of the pot and scorching. The rice will have “blossomed” (the grains will have swelled and split). Remove the chicken and set aside. Continue cooking the congee for another 1 hour, stirring occasionally, until it is thick, creamy and almost smooth. Taste; season with more salt to taste if necessary.
4. Meanwhile, once the chicken is cool enough to handle, shred the flesh into medium sized pieces. Discard the skin and bones. Set the chicken shreds aside.
5. When the congee is ready, turn the heat off. Discard the ginger. Heat large soup bowls by pouring boiling water into the bowls then pouring away the water. Ladle the porridge into the heated bowls. Top each serving with chicken shreds, and a pinch each oftong chai, fried shallots, scallions and coriander. Finish with a drizzle of toasted white sesame oil. Serve immediately.

Copyright of Joycelyn Shu. Reproduced with Permission.

Lotsa Laksa

Internationally-renowned photographer, Russel Wong, recently posted about laksa on his blog. He included his Mom’s recipe, a family heirloom, and even tackled the sensitive and controversial topic of Which is the ‘Real’ Katong Laska – a debate I choose to stay … Continue reading

About Peranakan Kitchen

Welcome to Peranakan Kitchen, where we celebrate the art, heritage and diversity ofPeranakan food culture!

Peranakan or know someone who is?

Chances are, you’ve heard the anecdotes about zealous Nonya grandaunts, cousins twice-removed, Baba uncles with a connoisseurship of embroidered kebaya et al and their jealously guarded recipes. And if a recipe is forthcoming, you can bet your weight in candlenuts that some vital step, technique, ingredient or measurement is either completely missing or misleading. You know, just so you don’t run off and mint millions with their recipe.

Here at Peranakan Kitchen, we believe in none of that. In fact, we believe in precisely the opposite, which is to say we believe in spreading the love and sharing the word – the immense wealth of knowledge and expertise we have is far too wonderful to be kept under wraps.

Here, you will find at your fingertips the ultimate online portal and authentic resource for all things Peranakan food-related. From long-lost heirloom recipes and time-honoured techniques, to exotic ingredients and must-have utensils, to tantalizing tableware and a rigorously edited selection of modern lifestyle conveniences which do not compromise on quality, our scope is deeply comprehensive yet readily accessible.